
The Art and Science Behind Piano Manufacturing
Creating a grand piano is a complex and highly detailed process that combines artistry, precision engineering, and craftsmanship.
Every step, from bending the rim to fitting the cast iron plate, plays a critical role in producing an instrument capable of delivering powerful, nuanced sound for generations.
Understanding this intricate process also highlights why pianos require specialized handling and professional moving services, like those offered by Keyboard Carriers in Denver, CO.
Bending the Rim of the Piano Case
The Foundation of Strength and Beauty
The manufacturing process begins with constructing the rim, one of the most structurally important parts of a grand piano.
- Steinway’s Time-Tested Method:
Following a tradition that dates back centuries, long-fiber maple wood layers are glued and bent in a massive metal press to form a continuous, curved rim.
- Both inner and outer rims are created in this way.
- Each rim consists of up to 22 layers, and each layer can be up to 25 feet (7.62 meters) long.
- Gluing and Pressing:
After resin glue is applied by machine, the layers are pressed into shape and clamped into braces to prevent warping. - Seasoning and Stabilizing:
The rims are stored under strict temperature and humidity controls until they reach the perfect moisture content to ensure lasting stability. - Assembling the Internal Structure:
The bent inner rim is then fitted with crucial wooden components, including:
- Cross block
- Pinblock
- Cross braces
- Keybed
- Backbottom
All parts are glued and dowelled into place to create the foundation for the rest of the piano.
Finishing the Cabinet for Strength and Aesthetics
A Multi-Step Finishing Process
The piano cabinet isn’t just for looks—it also affects the instrument’s resonance and durability.
The finishing process is elaborate:
- Sanding:
The cabinet is sanded carefully to ensure it absorbs stain evenly. - Bleaching:
Wood surfaces are bleached to create a uniform color across the veneer. - Staining and Filling:
- Pre-stain treatments prepare the wood.
- Wood fillers and washcoats are applied to fill pores and smooth the surface.
- Sealing and Lacquering:
- An initial sealer or lacquer coat is applied.
- Followed by two more coats of lacquer, sanding in between each layer.
- Decorative glazes may be added for antiquing or custom finishes.
- Final Touches:
After drying for up to 21 days, the cabinet undergoes hand-rubbing to achieve its final polished look.
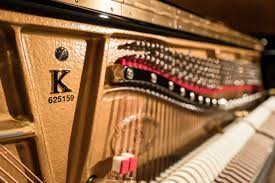
Making the Piano’s Structural Components
Building the Framework
The structural framework is what gives the piano the strength to withstand over 20 tons of string tension.
- Braces:
Crafted from select spruce, these support the entire framework. - Pinblock (Wrestplank):
Made from bonded layers of rock maple, the pinblock securely anchors the tuning pins. - The wood is either quarter-sawn or rotary cut for maximum grip.
- Up to 240 holes are meticulously drilled—one for each tuning pin.
Casting the Iron Plate: A Critical Step
Creating the Backbone of String Tension
The cast iron plate must be robust yet allow sound resonance to flow freely.
- Match-Plate Creation:
Metal match-plates are created from the engineer’s wooden pattern design, forming a top and bottom mold. - Sand Molding and Casting:
Sand molds are made from the match plates.
Molten iron is poured into the molds, allowed to harden, and then carefully cooled to produce a plate weighing about 600 pounds (272.4 kilograms). - Cleaning and Finishing:
- Sand is blasted off using steel grit.
- Holes are drilled for tuning pins, nose bolts, frame bolts, and hitch pins.
- Hitch pins are inserted.
- The plate is hand-sanded, primed, and painted for final installation.
Fitting the Cast Iron Plate
Before final assembly:
- The plate is suspended above the piano.
- It is lowered and raised several times to ensure a perfect fit.
- Adjustments are made to the pinblock, rim seal, soundboard, and bridges during this process.
This step demands extreme precision, as the fit must be perfect to support the tension of the strings while preserving the instrument’s tonal beauty.
Preserving the Integrity of Every Piano
Each grand piano represents hundreds of hours of meticulous craftsmanship.
Every rim bend, wood joint, plate casting, and finish coat plays a role in the piano’s ability to produce breathtaking sound and stand the test of time.
When moving a piano, it’s essential to protect all of these sensitive parts.
That’s why professional piano movers like Keyboard Carriers treat every instrument with the care it deserves, ensuring it continues to perform at its best for years to come.
Contact Keyboard Carriers for Professional Piano Moving Services
Trust your precious piano to movers who understand its delicate construction.
Whether you’re moving across Denver or relocating across Colorado, Keyboard Carriers offers expert piano moving and storage services you can depend on.
👉 Contact us today to request a complimentary piano moving consultation!